[Do you like this? Please subscribe to my YouTube Channel and then share it for me!]
Video Summary
Google introduced a free tool called Optimize or Google Optimize, as it’s sometimes called, to help businesses start making results-based improvements to their websites.
Essentially, the tool allows you to run different types of experiments, including A/B tests, redirect tests, and multivariate tests to determine which version works best with your audience.
This video is about setting up Google Optimize for free A/B testing. Continue watching to see the whole process from start to finish and implement it on your website.
Video Transcript
So you want to know how to set up Google Optimize for free AB testing. Well that’s awesome and you’re in the right place.
I’m going to go to my computer and screen capture the entire process for you with a live example. You’ll see how I create the test in Google Optimize and how I put it into a live website.
Are you ready? Let’s go to my computer and dig in step-by-step so you can see the whole process from start to finish.
Setting up Google Optimize
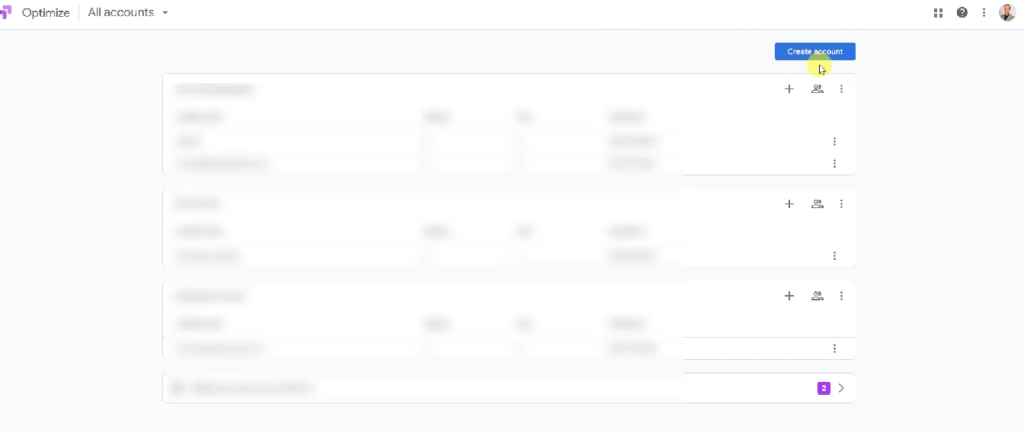
All right, let’s get started by going to optimize.google.com. You might have to log in to your Google account to get to this point if you’re not logged in already.
Otherwise, you’ll end up on a page like this one where you’ve got the create account button in the upper right, or if you’ve never been to Google Optimize in the past, you might have to go through the get started process.
It’s pretty obvious if you see a button that says get started, then you’re going to have to click that. I’ve got a real quick demonstration on how to get started in a video called How to Set Up Google Optimize the First Time. So do that and then come back.
So now I assume you’re looking at a screen like this one where it shows the create account button. There’s one other possibility though. You might be on a screen that says create your first experience with a “Let’s Go” button.
If you see the create your first experience page, just hold on, I’ll be with you in a second, but first I need to get everyone else to that point because you’re just a little bit ahead. Now if you’re seeing this page with the create account button, you go ahead and click that. Then you have to name your account.
Creating a Container
What I do is I like to choose the name of the business that I’m working with, so in this case Chocolate University Online. The next step is going to be to create what’s called a container and within the container we might have multiple websites for that business.
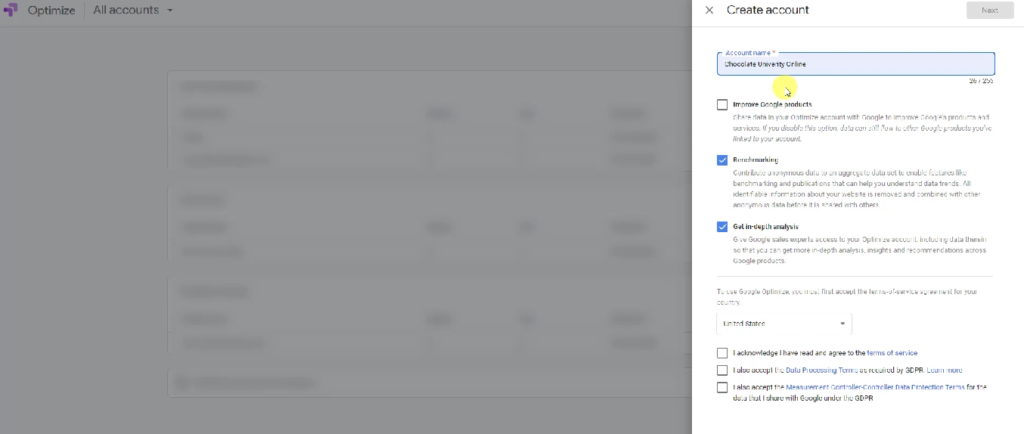
Starting out with a business name tends to work, but you can name your account whatever you want and if you decide to change your mind later, you can change it later. So It’s not like you’re locked into anything. Just get something in here for now. The next thing you have to do is decide on what type of data sharing you want.
Google gives you three options. Two of them are already checked for benchmarking and get in-depth analysis. You can read these. I’m not going to describe them for you, but what I will tell you is that this first one makes another decision possible.
So when we get down here, you’ll see. After you decide which of these to pick, then make sure your correct country is chosen. Below that, you have to acknowledge the terms of service. So within the United States, the only one of these I have to check is the first one that I acknowledge that I have read and agree to the terms of service.
And the moment I click that, the next button becomes available. If you’re in Europe, you’ll have to check the second one as well to accept the terms as required by GDPR. The third option is accepting these data protection terms and that one is necessary if you choose this first option.
So if I choose to improve Google products by sending in Optimize account data, then I also have to check this one to get to the next button. In this case though, I’m going to disable that. I’m going to disable this and I will also turn that off since I’m in the US and don’t need that. Then click next.
Next, you add the container, and in this case I’m going to use the website URL, just like the example shows, so it’s chocolateuniversityonline.com, and then hit create.
Now we’re up to the Let’s Go button. If you see this page to begin with, then you’re already here and that’s because this is the first time you’ve ever been in here and so it just brought you to this page.
Starting Your Experiment
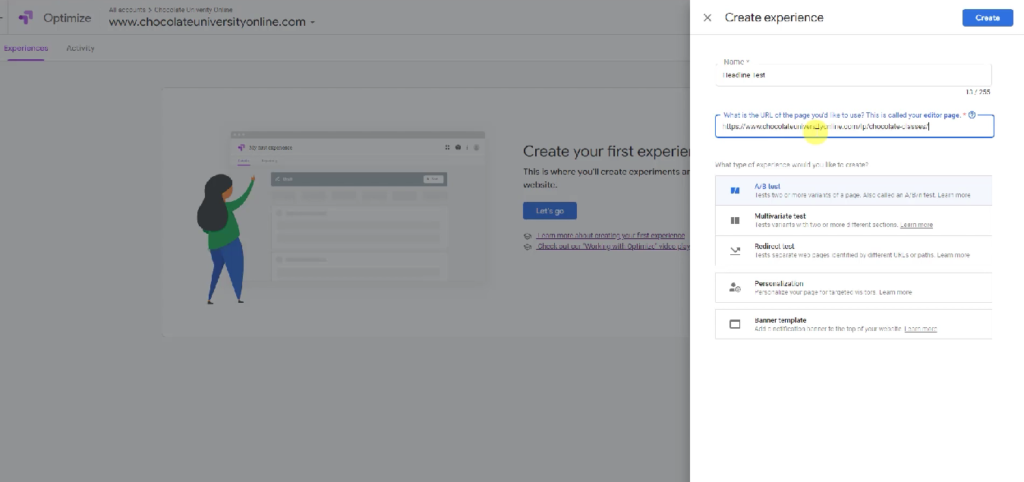
Now you need to click the Let’s Go button. Next you can name your experience. So in this case, I’m going to be testing the headline. So that’s what I’ll put in here, headline test. Then once you’ve got your name in there, then you need to select the type of experience you want to create.
By default, the A/B test is selected and that’s the one I’m using in this so I don’t have to touch it. Then you have to fill in what is the URL of the page that you’d like to use. And for that, I’m just going to paste the page in here and then I hit create and now it takes me to the optimized setting.
So we’ve got the URL. This is the headline test. It’s an A/B test variety and we’ve got to get through all of these steps here before it’s completed. We have to create the variants, add some rules, link to analytics, set up objectives, and start. So all of these steps have to be completed before you can go on.
Adding a Variant
The first thing I’m going to do is click add a variant. So we have the initial page. This is the page that we already have set up. When I add variant, I get to name the variant. So I’m going to call this alternate headline. Again, you can name it anything and the names can be changed.
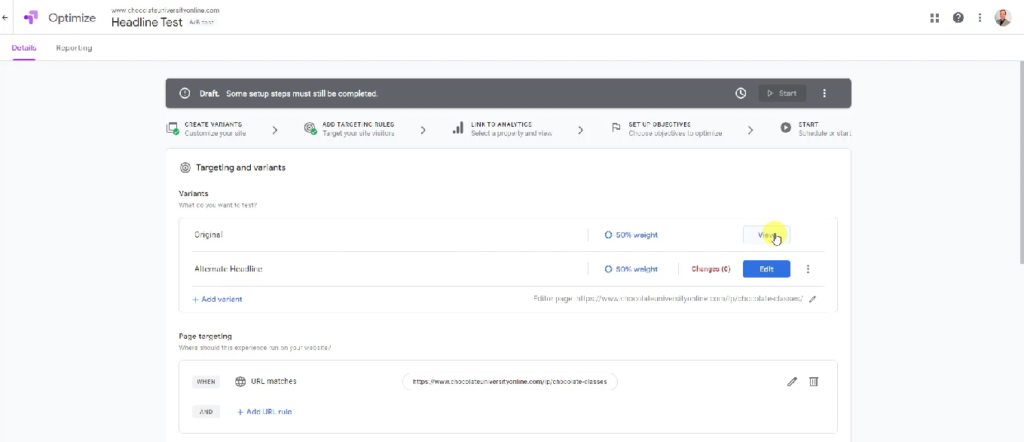
So then it shows I’ve got the original and the alternate. If I click view on the original, it’s going to bring up a page that lets me take a look at what that original page looks like. And this is it. It puts it into the optimized editor, but there is no editing I can really do in the original. It just lets me look at the different sections.
I’ll click done, but the alternate headline, this we can edit. This is a really neat feature of Optimize. We can edit the content right in the optimize editor and then we’ll have two different versions of this page.
I will click here because it’s the headline I want to change. Click here and then I have the option to edit the element. So I will click that.
I’m going to edit the text and now it lets me change the text. So instead of saying immerse yourself in the feeling of chocolate, I’m going to put in what I’ve learned about chocolate that, and maybe I’ll come down here, every chocolate lover needs to know.
There we go. So that’s the alternate headline. And once I’ve got that, I can click done and that’s in the page. I can click save and then done. Now I have the original and the updated alternate headline.
Page and Audience Targeting
So page targeting, when does this experience run? It’s going to run when it matches this page, and that’s the only targeting I need to do here. The audience targeting, who should see this? All visitors to the page. I have the ability to customize, but I’m not going to.
This is a simple introduction, not a complex one. You can always come back and make it more complicated on future experiments. But since this is the first one, let’s just keep it simple. So a description, we can enter it here if this is meaningful. You don’t have to enter a description, but testing Immerse Yourself versus What I’ve Learned.
And it just puts that description text in here. Now, Google Analytics, you have to link to your Google Analytics account and this is not a video about Google Analytics, so that’s something you’ll have to take care of on your own.
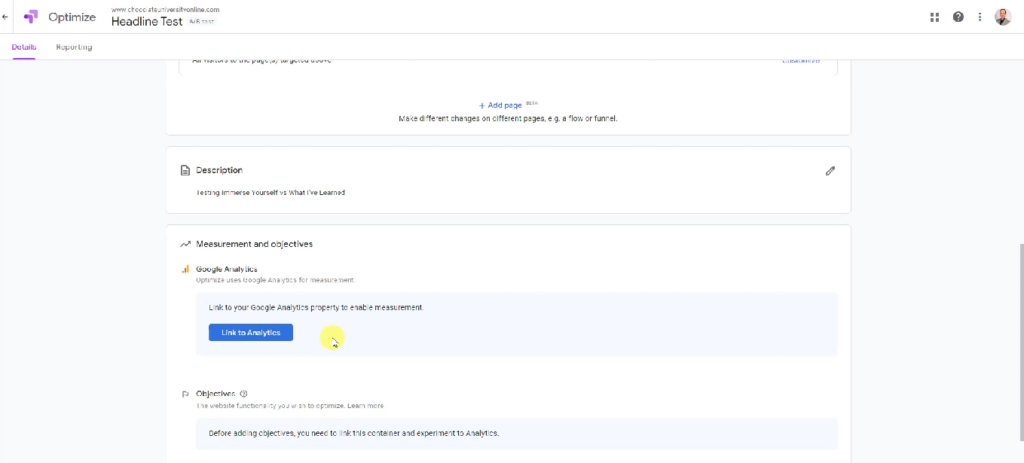
If you don’t already have Analytics, it is something you’ll need to set up. I will click on link to Analytics and then the link a property shows up. I have a lot of properties, so I’m going to select the appropriate one. And then once the property is selected, it gives you the option for different views and that is the only view I have.
So that is all set and it just gives you a quick announcement that linking it allows the data to flow between these two products. And so I will click link, and now it shows the property, the view, the experiment ID, and now the very important objectives.
Setting the Primary Objective
Setting the primary objective of your experiment is important because this is the result you want to achieve. So when you run the experiment, the experiment is going to test which of your variants leads to the maximum number of times your objective happens.
In this example, we want to see which headline results in the most purchases. That’s what I’m going to set up here. So click on add experiment objective, and you’ll see there’s two options: choose from a list and create custom.
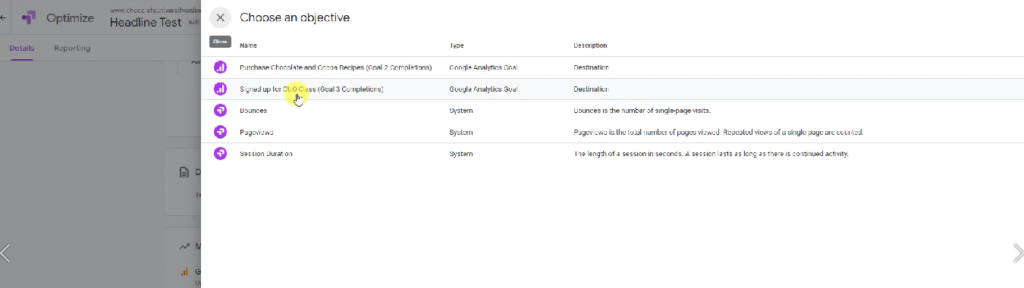
If I click choose from list, these are pre-selected options. And these three here, bounces, page views, and session duration, these are always present, always available for you to choose. And I typically find these are insufficient. They just don’t do enough to make the testing worthwhile, at least in my opinion.
If in your Google Analytics you’ve created any goals, those goals will show up up here. So you can create a goal in Analytics and use it as your objective in your Google Optimize. And that’s pretty cool, but I’m not going to assume that you’ve done that. So I’m not going to select it here.
If I did, let me just show you real quick. I will choose signed up for a cool class and you’ll see that that objective now shows here and that completes the objective requirement, but I’m not going to use that.
So I will click the three dots and remove that from the experiment. Instead, I’m going to create a custom, and in this case what I want is page views because I am going to use the thank you page.
If somebody came to that first page and they ordered, they’re going to end up on a thank you page. So if I put the thank you page in here, it allows me to do a test that says, does this headline or this headline result in more people getting to the thank you page?
And that’s exactly what I want to know. So I’m going to say Start With. You could choose equals, but I’ve had better luck with Start With and that way you don’t need the whole thing.
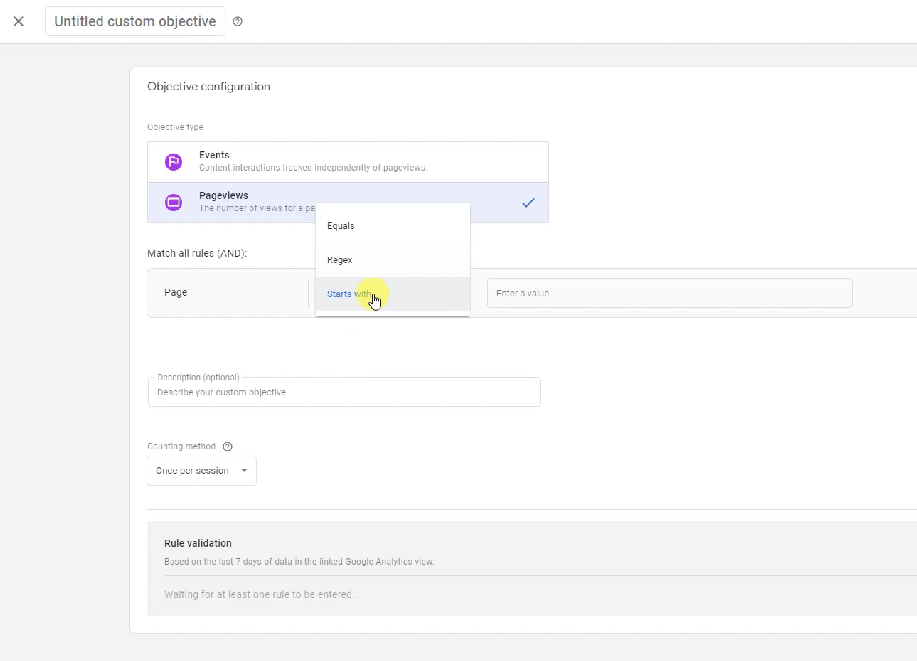
In fact, I have situations where I have multiple thank you pages, so I might not know the exact URL, but I start them all the same way so that I can just say if they end up on a thank you page after this, it’s a win.
I will enter that address here. And you don’t need the whole URL, you just need the part after the website address. I don’t need the www.chocolateuniversityonline.com piece, just what comes after. So I will put that in and again, it can have a description of the objective and I might do that, made it to the thank you page.
And how do we count? Once per session or many per session? It’s just going to happen once in the session that somebody’s going to make it from the original page to the thank you page. So once per session is fine.
And what shows up here is the rule validation. It’s going to tell you how many times this has already occurred within the last seven days. So in this case it says it occurred one time and that’s good. That means I’ve put in legitimate information and it’s a good double check for you too.
If you check how many times did this actually happen and this number here matches, then you know you’ve set it up correctly. If I had seen a zero sessions here, then I would know I did something wrong because I know there was a session that actually has completed in the last seven days.
Once I have this all set, I click on save and name my objective. In this case it’s I’ll say made a sale. And now that shows up down here. Now we go into the settings and there’s a few options I have to choose from.
Optimize Installation
So the first one, Optimize installation, it’s not verified. Before starting your experience, verify that Optimize is correctly installed and you can click this to view instructions.
Let me show you that. So here you have to pick the Optimize snippet and install it. So I’m going to click here to copy this. Snippet has been copied. And then I need to go into the Chocolate University Online page and insert that into the code. Now how you do this depends on how your website is set up.
In this case, this website is WordPress, and in this instance of WordPress, I’m using a plugin called Optimize Press. And this version of Optimize Press has headers, and I can just paste this in.
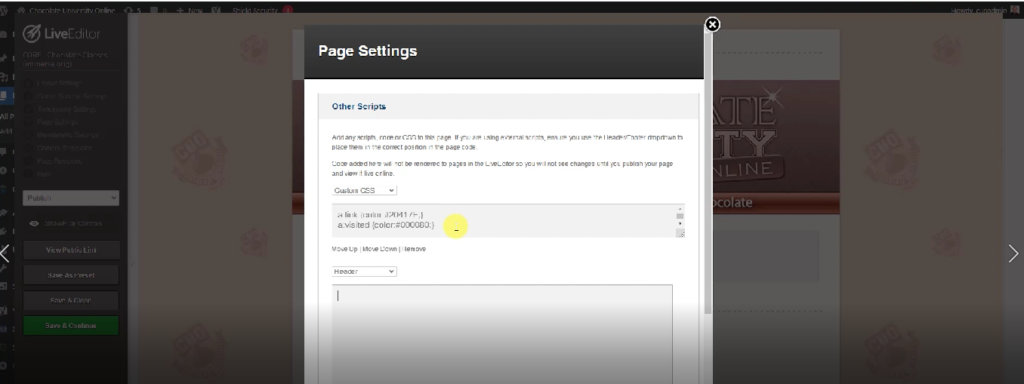
If you’re not using Optimize Press, there are plenty of other plugins that will allow you to insert a header or your theme may have the option to insert a header script as well. If you’re using some tool other than WordPress or you’ve created a website by hand, you may have to find another way to get it in there.
Talk to your website developers if necessary. But this code just belongs in the header part of your page script. And once it’s in there, I will just hit update and that gets added to the page.
Then I can come back here and click on check installation. Google runs its tools and Optimize is correctly installed. That’s what I’m looking for. If that’s what comes up, then I know all as well and I can go back to the experience.
Now I’m at the top. It shows that I have created variants. I’ve got the check mark for add targeting rules. I’ve got the check mark for link to analytics. And I’ve got the check mark next to choose objectives to optimize. The only thing left here is that it shows I can start, but let me go back down here to the settings.
You also see that this is checked. You have the option to receive email notifications. So if you want notifications about the progress of your experiment, you can just turn this on.
Allocate Traffic
You also have the ability to allocate traffic. So I’m saying 100% of traffic is going to go through this experiment. That’s a good place to start. Essentially, that’s going to mean that 50% of traffic goes to one variant and 50% goes to the other. And when do I want this activation event to occur? I want it happening when the page loads.
So that’s it. Everything is set up for me here. The one other piece that you may need if you haven’t done it already, is to get set up in Google Chrome with the Optimize plugin. If you need that, Google’s going to prompt you for that, and that’s another step. You’ll just have to follow the instructions there to go through.
That is not part of the scope of this training. So here we are. Everything is good. The draft is ready to start. I can preview these. So let me take a preview of the original and I’ll call it a web preview so you can see, immerse yourself in the feeling of chocolate.
Draft Preview
And I can come back here and I can say preview the alternate headline. Again, web preview. And it shows what I’ve learned about chocolate that every chocolate lover needs to know.
So I’ve got the two different versions right there. So it all looks good. I click start. Again, it’s confirming that I can receive the email notifications. I already have that on, so it’s set and I click start.
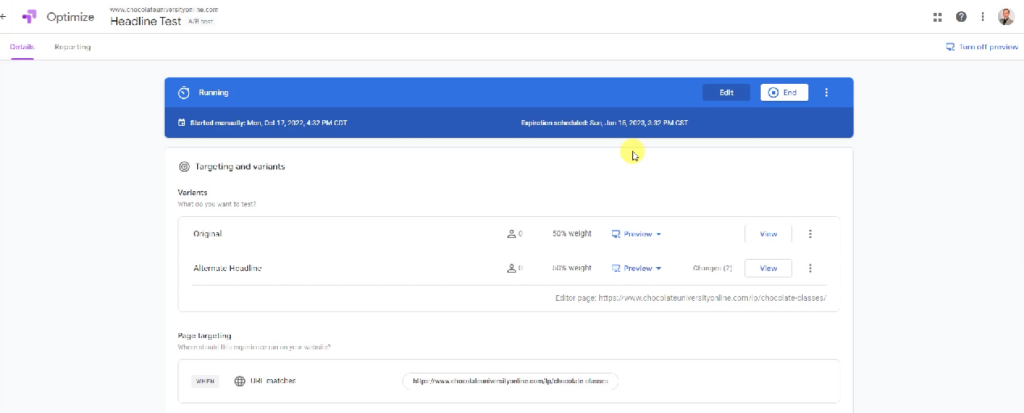
And we’re officially off and running. If nothing else happens, this experiment will expire on January 15th, 2023. It’s going to run for 90 days. If it gets decisive data before that, it will end before that. So this shows me here that no experiments have run yet, but as time goes on, as people see the original or the alternate, these numbers will change.
I’m going to turn off the preview, close these windows, and everything is now in good shape. So I can exit this Optimize instance. And I’m back to looking at the main page here. At any point in time, I can click on the test to come back and see what the reporting data is.
Well, how did you like that? This video is about setting up an experiment. It’s not about looking at the data. Maybe I’ll do another video in the future that looks at the results of an experiment.
I hope this helped you. I suggest watching it again as you do each step. That way you can see what I’m doing and implement right away. And if you are interested in the plugin called Optimize Press, which is what I mentioned I’m using, you can get it through this link.
Since you made it this far, would you please help me out by liking this video and subscribing to my channel? I would really, really appreciate that.
Your business deserves to be seen online and I will help you get there. Thanks for watching and have a great day